
There are a number of benefits to installing in-ceiling and in-wall speakers. For one, they look great and blend seamlessly with the rest of your room or home theater. But looks aren’t the only reason for installing in-ceiling or in-wall speakers. There are many speakers that perform incredibly well and provide a phenomenal surround sound experience too. The configurations are limitless with wall and ceiling speakers and you don’t have to worry about taking up floorspace or clutter from bookshelf speakers or floorstanding speakers.
But, the downside to in-ceiling and in-wall speakers is the installation. Seamless surround sound doesn’t come too easy and there are a number of factors that you will want to consider before making a decision to go the in-wall and in-ceiling route (if you haven’t already). But, the payoff to this type of surround sound is tremendous. In the case that you choose the in-wall and in-ceiling setup, we’ve documented steps for you to install your own speakers. For the DIY savvy, this should be pretty straight forward!
Tools Needed
Before we begin walking through the steps to install your in-wall and in-ceiling speakers, let’s walk through the tools that you’ll want to have handy. Click on the tool to buy the tools that we highly recommend for this installation:
- Protective Goggles ~$4.50
- Ladder ~$130
- Pencil ~$6
- 3M Painters Tape ~$7
- Philips Screwdriver ~$6
- Wire Cutters ~$5
- Wire Strippers ~$5
- Stud Finder (Needs to detect metal pipes, AC wires and other obstacles) ~$30
- Utility Drywall Knife (Box Cutter) ~$5.50
- Dremel (or Jab Saw) – We prefer a Dremel as they typically come with a circle cutting jig that simplifies cutting circles in Drywall. Downside is the Dremel is more expensive. ~$75 or $11
- Measuring Tape ~$10
1. Choosing Your Speaker Location
Choosing your speaker location is by far the most important aspect to installing your in-ceiling speakers or in-wall speakers. Without the right placement, your surround sound won’t perform to its potential. And once they’re installed, it’s very difficult to move them so choose wisely. There are a number of configurations you can choose from. Here’s a few (thanks to Crutchfield.com). Depending on the room configuration, the amount of money you want to spend and the amount of time that you want to spend installing, you can choose between:
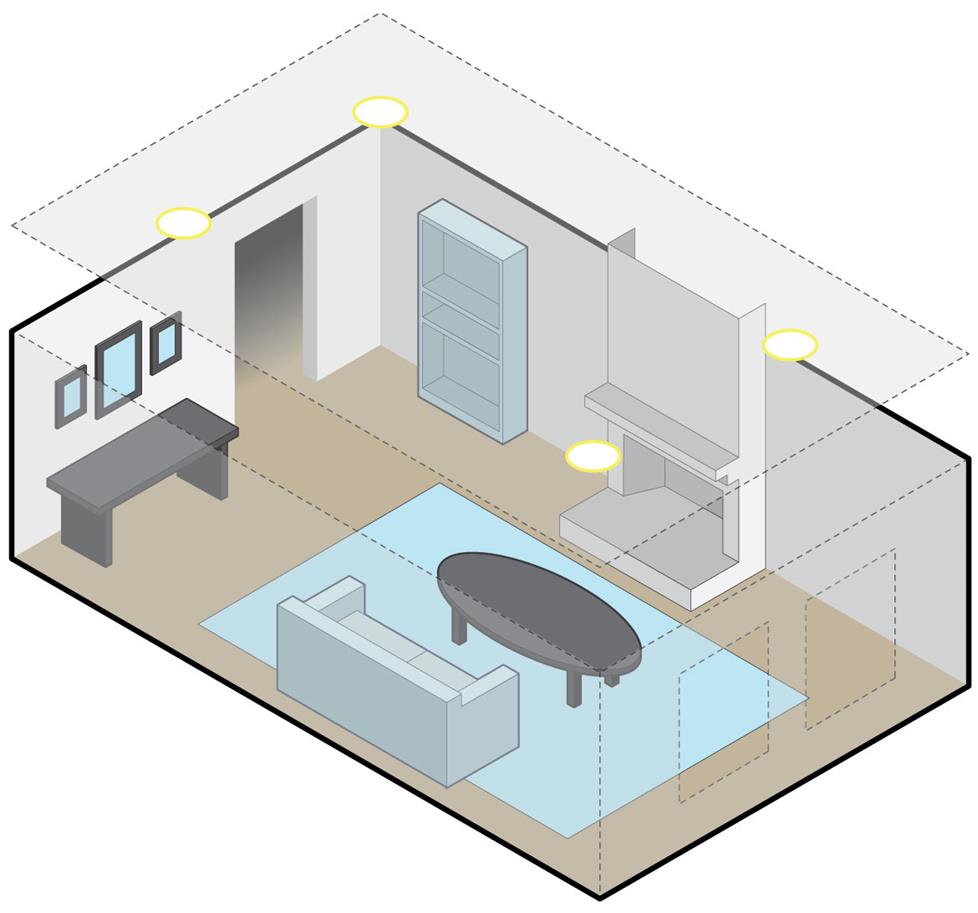
- In-Ceiling Speaker Configuration: In this configuration, you’ll install four in-ceiling speakers spaced evenly across the area that you will be listening. Ensure that you place your speakers in the area that you will be seated and listening/watching. No need to place your speakers at the far side of a room where you will not be listening to your music or watching TV from.

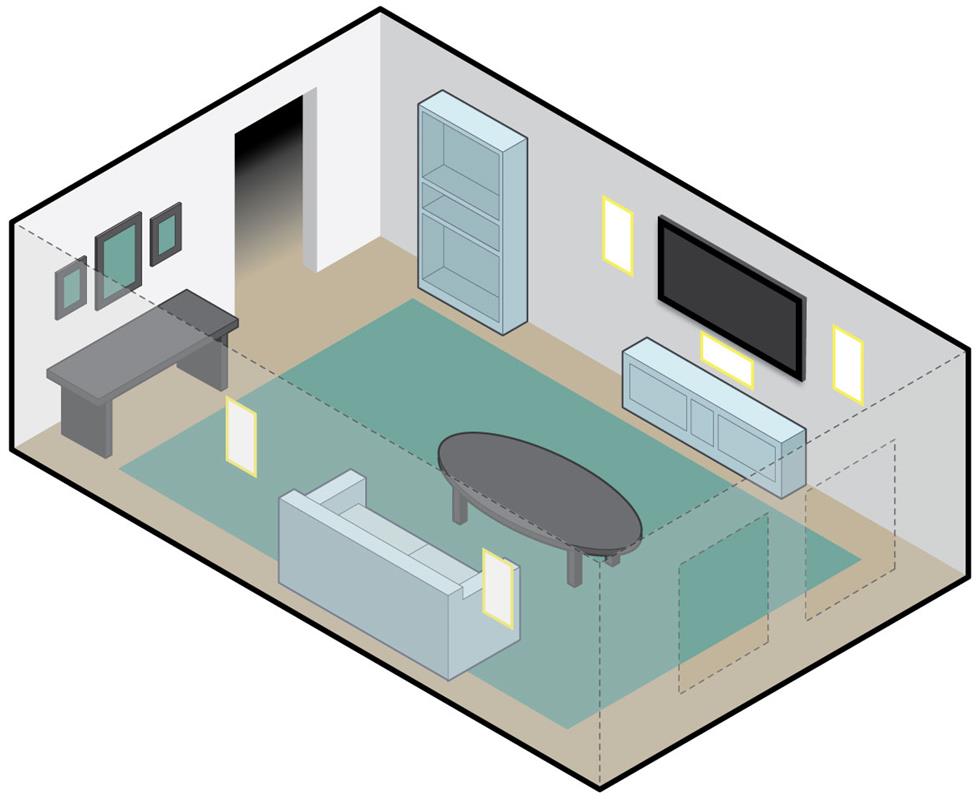
- In-Wall Speaker Configuration: In this configuration, you’ll be utilizing in-wall speakers to create a surround sound similar to a 5.1 system. This system will provide sound that is more directed at seated listeners and watchers. It’s a bit more expensive for this setup but will provide a better performing and listening experience. In this setup, there is a total of 5 in-wall speakers.

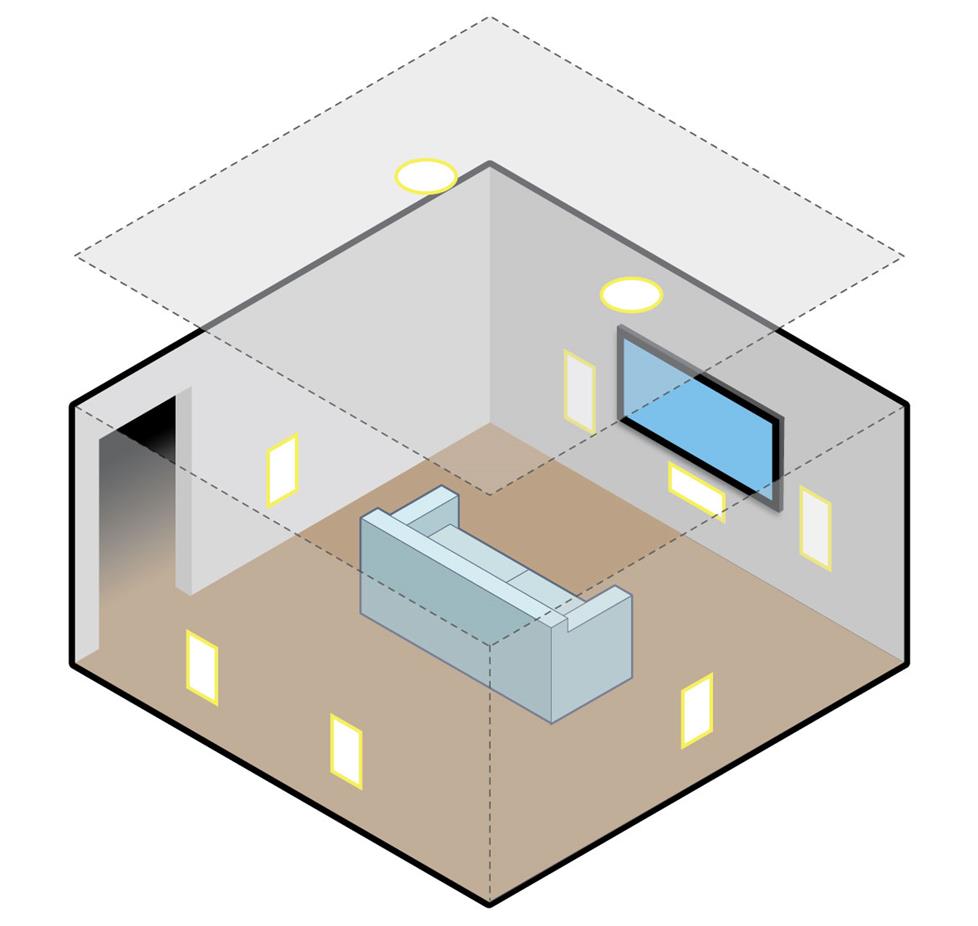
- Hybrid Configuration: This is by far the ultimate configuration of the three that we are showing here. It’s the most expensive too but if you’re looking for a killer system, this is our recommendation. This setup includes 7 in-wall speakers and 2 in-ceiling speakers.

2. Preparing for Installation
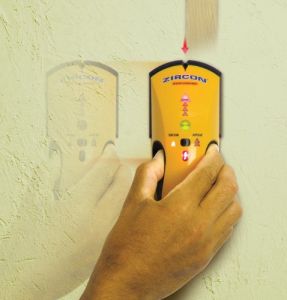 Once you’ve chosen your configuration style, next step is measuring. Evenly measure the distances of each of your speakers and use your pencil to mark the center of each of the speakers. Ensure that there are no studs or hazards behind the wall with our recommended stud finder and make sure that there is optimal space in the wall or ceiling to accommodate your new speakers. This includes wires, water or drainage pipes, and etc. Use our recommended high-quality stud finder for this step. Another thing to keep an eye out for is your central AC and heating air ducts. Take a look around to find any air ducts and try to figure out where they may be located. Once you’ve chosen the perfect spot(s) for your speakers, lightly outline your speakers on the wall to ensure even placement and an overall visually appealing, symmetrical looking setup.
Wiring your speakers
If your home doesn’t already come outfitted for in-ceiling speakers, this will be the most difficult challenge and you’ll want to make sure you consider this step when you’re choosing your speaker location. In-ceiling and in-wall speakers aren’t wireless speakers, so you’ll need to place individual wires for each speaker and wire it back through to the location of your A/V receiver or Amplifier. Once you have determined your location of your speakers and have cut the holes, you’ll need to run your wires from each speaker back to the receiver. Plan accordingly!
Drill a pilot hole
Now that you’ve chosen the ideal placement for your speakers and have placed a central mark to each of the speakers with your pencil, you’re ready to start. First, turn off the power in the areas that you’ll be installing your in-ceiling and in-wall speakers. Drill a small hole in the middle where your mark is, making sure you’re extra careful just in case there’s something behind the wall. If you use the Dremel to drill the hole, or a standard drill, try to set the drill bit around 1/2″ so that it reduces your risk of drilling into something behind the wall. If the drywall is larger than 1/2″, then increase the depth of the drill bit until it goes all the way through.
Check behind the wall
Using the pilot hole that you just drilled, stick a bent coat hanger or sturdy wire through the hole and twist it to see if there are any obstacles behind the wall. Use a coat hanger or wire that’s about the same length as the radius as the speaker. Note that many walls will have insulation that you might feel behind the wall when you use your probing wire or coat hanger. You’ll feel the insulation but as long as there are no hard obstacles, you should be fine. Check each speaker that you’ve marked.
Cutting the holes
There are many ways to cut your holes in the wall. For circles, we recommend using the Dremel. The Dremel we recommend above comes with a tool that allows you to cut perfect holes with ease using your pilot hole as the focal point. Or, use a Jab Saw or Drywall Knife to cut the outline of the speaker (use the template that came with your speaker in this case). For all cases, drywall makes a mess. We recommend using painter’s plastic to cover the floors and the furniture that might be underneath or around the area that you’re cutting to reduce the amount of cleanup. Also, in particular for in-ceiling speakers, WEAR EYE PROTECTION. There’s nothing more irritating than drywall dust and fragments in your eyes. Believe me.
3. Installing the Speakers
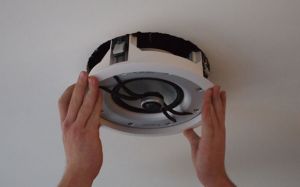 Your holes are cut! Now it’s time to test your measurements. Take a speaker and test each of the holes and ensure that the speaker fits. If the hole needs adjustment, take your drywall knife and cut out areas that need to be larger. Pull your speaker wire through the hole and connect the speaker to the corresponding positive and negative conductors, ensuring it matches with the positive and negative side that is connected to the A/V Receiver or Amplifier. Place the speaker back in the hole and tighten the screws. If your speakers are adjustable, or have adjustable tweeters, point the speaker or tweeter to the central location that you’ll be seated or listening/watching from. Finally, place the speaker grilles back on.
Test each speaker with sound before moving on to the next speaker! This way, if something is wrong you can identify it early. And you’re done! Congratulations. Now you can enjoy the benefits of a surround sound with a system that doesn’t add clutter or change the look of your room or theater.
Still looking for a quality set of speakers? Look no more, check out Household Audio’s list of the Best In-Ceiling Speakers!