
Setting up a video projector can require a little more thought and effort than a 4k HDTV that sits on top of a piece of furniture. For an HDTV, the only thing you need to worry about is wires and placement. Projectors are different. But don’t let that discourage you. A new 4K or 1080p projector can provide some of the best media viewing experiences right to your home. Our quick guide to setting up a video projector, we’ll walk you through the basics to getting a home theater projector up and running with ease.
1. Choosing a Screen For Your Home Theater Projector
Without a projector screen or quality surface, your projector will not perform to its full potential. TVs have their screens built in, but for projectors you need to determine the type of screen that will work best with the projector that you’ve purchased.
Once you have chosen a screen, you’ll need to find the ideal location and decide how you’re going to mount it. When your screen is set up, you’re ready to begin installing and configuring your new video projector.
2. Placing Your Projector
Placement is a critical step to setting up your projector too. It will determine the quality and performance of your video. There are four key positions to consider:
Front Positioning: This is the most easy to set up and probably one of the most common. Front positioning when the projector is placed on a surface that is in front of the projector screen. Configuring the distance is easy since it’s at a height that you can reach it. However, unless it’s mounted to the surface your projector might be more prone to movement, which could require you to re-focus and configure.
Ceiling Mounted: Another common position for projectors is to simply mount it to your ceiling. This position is the same as front, but mounted higher. The benefit is that the projector with is out of your way, but it’s a little more difficult to install than a front position.
If you choose to ceiling mount the projector, you’ll need to connect it to a ceiling mount. Most projectors on ceiling mounts are upside down and you’ll need to invert the image so that it is right side up after installation. Make sure that your projector supports ceiling mounting and can invert the image; otherwise it’ll be upside down.
Rear Positioning: Rear positioning is a little less common. If you have the space to do it, it’s a great option. In a rear position, it’s essentially the same as front position but the projector is located behind the screen and projects onto it. For this time of placement, you’ll need a rear projection compatible screen however.
If you choose rear placement, the image will be horizontally reversed by default. You’ll need to ensure that your projector supports rear placement, and once it’s placed flip the image 180 degrees horizontally so that the image is correct. Otherwise, you’ll be reading your movie and show title backwards!
Rear Ceiling Mounted: Combine the rear positioning with ceiling mounted and this is what you get. You’ll need a rear projection compatible screen and will need to mount it to your ceiling.
Once you’ve chosen the position that best fits your space, you’re ready to start to install it. Be sure to read through the manual to find the optimal distance for placement. This applies to all positions.
If you chose between Ceiling Mounted and Rear Ceiling Mounted, there are a few things that you will need to consider when you install the projector. For one, you’ll want to ensure the distance matches what’s recommended for your projector. Measuring distance for a ceiling mounted projector is a little bit different than front mounted (and a little more difficult). Most of the projectors will provide charts in the user manual to help calculate the distance that you’ll need to place it. One recommended method is to measure the distance on the ground and use a pole to mark the location from the ground to the ceiling. However this can be tricky. Make sure that it’s centered with your screen. Epson offers a great tool that calculates distances for you. You can find it here.
3. Connect Everything & Turn It On!
Now that your projector is mounted, it’s time to connect power and all of the sources. Once power is connected, and you have a video source connected it’s time to turn it on and begin testing and adjusting the image (if needed).
First, align the image to your screen. You can do this by going into your projectors menu and adjusting the placement. Select the placement that you’re using so that the image is correct (if it’s upside down, backwards, etc).
After you’ve selected your placement you’ll want to start to adjust the image on the screen. See our next step
4. Adjusting Your Image
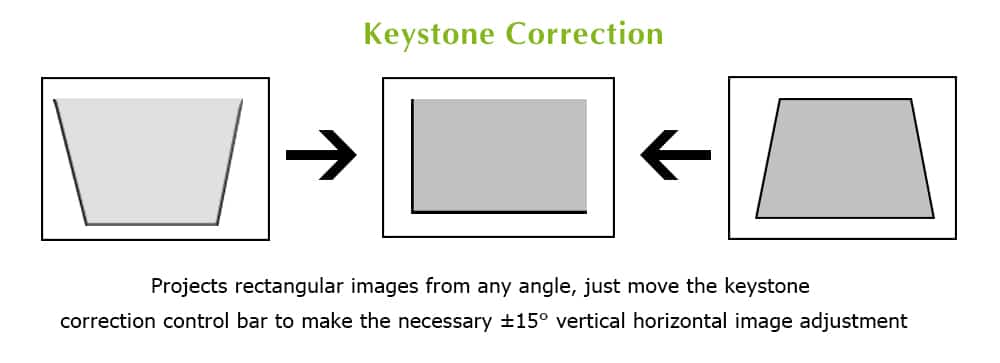
Now that you have your image on your screen and it’s projecting correctly, you’ll need to adjust the image to fit exactly to your screen. You can do this using what’s called Keystone Correction.
Keystone Correction is a tool that’s used to make sure that the sides of your projector’s image align with the screen rectangle as best as possible. Within the projector’s settings, find the keystone or image settings and adjust the image so that it fits perfectly in your screen. Within this tool you’ll be able to adjust the width, height, scale, position.
5. Focusing & Optimizing Your Image
The final step to setting up your projector for home theater viewing is to focus and optimize your image. The first thing you need to do is set the default aspect ration. This is the length and width ratio that the image will appear as. Typically, for home theaters 16:9 is the optimal aspect ratio.
Focusing is next. Project an image that has a few long visible lines that you can see clearly. Once you have this image projected, adjust your projector’s focus until the lines are clear and precise and the blur is gone. Different projectors have different ways to adjust the focus so refer to your manual to do this.
Finally, there’s the picture quality. Your projector will come with a number of preset picture settings. These are simple, hassle free settings that allow you to choose which picture looks best for the media that you’ll be watching. For example, you may see Normal, Dynamic, Standard, Cinema, Sports, etc. Choose the configuration that best projects the type of image you’ll be watching (e.g. sports or movies).
Or, if you’re the savvy type, you can enter the video projector’s manual settings to adjust things like tint (hue), sharpness, brightness color, video noise reduction (DNR), Gamma, and more. If you are not familiar with these settings, it’s not recommended that you adjust them. Stick to the presets.
Note: If you have a 3D projector, all of the steps above apply in the same fashion as all other projectors. The only difference is you’ll need to wear glasses!