
In this article: We’ll look at some of the best 4K Projectors on the market today, how they compare to each other and provide quick overviews of the pros, cons and some of their key features that make them great
One of the biggest leaps in entertainment technology has been 4K technology. Projectors that utilize 4K technology offer an unparalleled home-theater experience. The quality of display and flexibility of these devices is superb. It’ll transform the way you watch movies and television.
Here is a list of the top rated and reviewed 4K projectors to help you choose the best products for your home theater.
| Our Rank | 4K Projector | Resolution | Lumens | True Native 4K | Price |
|---|---|---|---|---|---|
| 1. | Sony VPLVW350ES 4K | 4096 x 2160 | 1500 | Yes | $$$ |
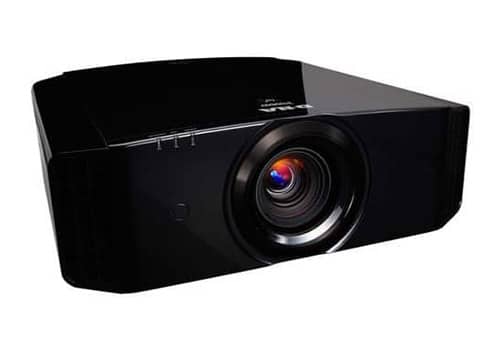
| 2. | JVC DLA-X700R | 3840 x 2160 | 1800 | No | $$ |
| 3. | Sony VPLVW1100ES | 4096 x 2160 | 2000 | Yes | $$$$$ |
| 4. | Sony VPLVW665ES | 4096 x 2160 | 1800 | Yes | $$$$ |
| 5. | JVC DLA-X900RKT | 3840 x 2160 | 1800 | No | $$$ |
4K technology encompasses a picture resolution that’s often 3840 x 2160 pixels. This is 4 times more than the typical Full HD format, which is 1920×1080 pixels. These HD screens are impressive in their own right, but 4K is on a different level. The first time you turn on your 4K projector you’ll be amazed at how great the image quality is.
In the past, older models of projectors couldn’t match the quality of a top-notch television. It was a convenient way to create a large image in a blank space. But the image quality could not compete. With 4K technology, these projectors are just as good as the best televisions. And what makes 4K projectors even better is that they can be used to create a much larger screen. Whereas televisions are limited to smaller sizes, projectors can create a quality image up to 300 inches! This is the way the home-theater experience was meant to be.
Buying a 4K projector will no doubt update any home theater experience. It is the future of the home-theater and will be loved by friends and family. That said, these projectors don’t come cheap. The technology and features are advanced, and come with a higher price tag. The price tag is worth it though, especially for those who take their home-theater seriously. We’ve assembled a list of the best rated 4k projectors, spanning from lower priced models all the way to the top priced (and top quality).
Our Best Pick 4K Projectors
Best Overall 4K Projector: Sony VPLVW350ES
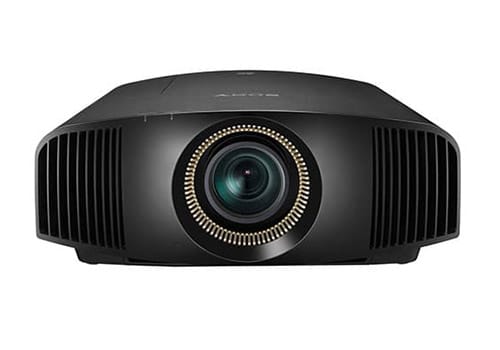
Sony VPLVW350ES Quick Review
Sony’s new 4K Ultra HD Projector provides amazing image quality at a great price. It offers the true clarity to movie theater technology. It boasts a resolution of 4096 x 2160 pixels, which is nearly 4 times the resolution of 1080p! The Sony VPLVW350ES 4K projector offers an incredible 4K media experience with a variety of settings. It’s easy to install, and can be mounted and configured for a variety of settings. And with the power of 1500 Lumens and Deep Color support technology, it’ll transform your movie experience. The projector features Sony’s Super Resolution algorithm, making your movies look better than ever. Combined with their “Mastered in 4K” algorithm which reproduces movies to match the original 4K images, you have a superb 4K projector.
The VPLVW350ES is recommended for screens up to 150”. With it’s high resolution and picture quality, the picture isn’t sacrificed on these large screens. And don’t worry about a noisy fan disturb your listening experience. The projector’s super-quiet fan features an advanced air discharge system.
You can always trust a quality brand like Sony to create durable, lasting products. But if any issues arise, Sony will cover any issues with its 3-year warranty. This warranty includes access to a special tech support line to solve any issues.
Best Value 4K Projector: JVC DLA-X700R
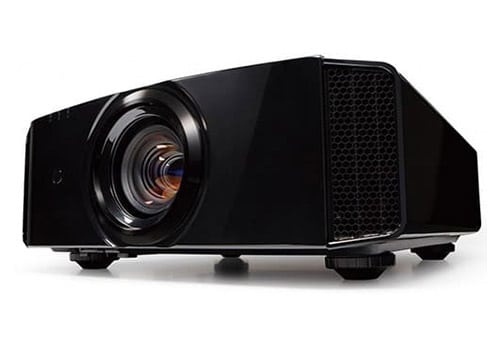
JVC DLA-X700R Quick Review
Enjoy rich and vivid pictures with the JVC DLA-X700R Projector. This projector uses cutting-edge SXRD panel technology with excellent 4K images and four times the resolution of regular HD. It has a number of features that allow viewers to enjoy to enjoy rich, sharp pictures in any setting. The JVC DLA-X700R boasts a powerful 1800 lumens. It has an impressive dynamic contrast ratio and deep black levels that compete with the best projectors on the market. This projector also uses 4K e-shift3 technology. This technology projects subtle tones and nuances in film for an incredible movie experience. The DLA-X700R also utilizes three DILA devices, creating clear pictures without any flickering. Overall, the home-theater experience is excellent. It’s nearly silent when running, unless you’re using its high lamp mode, which isn’t common for most users. With this projector, if you have a quality projector screen and a dark room, the picture quality will be incredible.
The JVC is also ideal for the DIY user. Installation and operation is simple with the DLA-X700R. It has a number of on screen adjustment features, which are controlled with a remote. Lens memory also allows for a quick setup. This projector does not come with 3D capability. But if you want that feature, you can purchase it via a few pairs of JVC 3D glasses.
Ultimate 4K Projector for Your Home Theater: Sony VPLVW1100ES
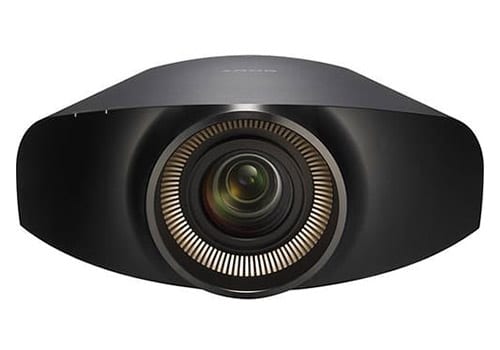
Sony VPLVW1100ES Quick Review
This projector is Sony’s flagship model. In fact, it is arguably the best 4k projector available on the market today.
The Sony VPLVW1100ES projector will take any movie experience to the next level. In addition to using native 4K content, this projector will upgrade any movie experience through Sony’s Super Resolution technology. Combined with Sony’s ‘Reality Creation’, it will enhance the resolution of any film, giving it a crisp look on all screens. The Sony VPLVW1100ES utilizes ‘Triluminous’ color, which creates vivid and deeper colors. In total, there are over 8 million pixels that give an incredibly realistic viewing experience.
The VPL-VW1100ES projector is a reasonable size, fitting into any home theater. It has a sleek design, touting a 2:1:1 motorized zoom lens and a massive 2000 lumens. This means it can be projected on a screen up to 200 inches! Setup is simple too. With a built-in 3D transmitter, simple picture calibration, and a variety of picture position formats you will be able to start watching films right away! And when you do, you can watch a variety of great 4K content through Sony’s 4K download service and Media Player.
Runner Up, Best Overall 4K Projector: Sony VPLVW665ES
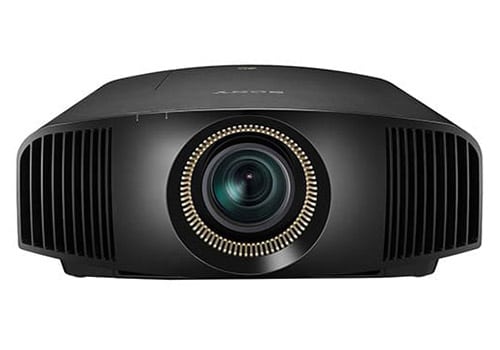
Sony VPLVW665ES Quick Review:
The Sony VPL-VW665ES provides superb color accuracy and image quality. Its advanced SXRD panel technology provides excellent 4K images. This rich display features 1800 lumens of brightness and a contrast ratio of 300,000:1. With this combination of brightness and contrast, pictures will always be sharp. Even in rooms that aren’t pitch black.
Are you a sports fan? Watching sports and action movies are incredibly life-like. There’s an incredible contrast of light and shadows onscreen thanks to the SXRD technology. Moreover, Sony’s Reality Creation technology allows Blu-Ray’s and DVD’s to display at near 4K levels. And Sony is so confident with this product that it is backed by a 3- year warranty.
Best 4K Projector on a Budget: JVC DLA-X900RKT
JVC DLA-X900RKT Quick Review
This new projector from JVC offers eye popping visuals and amazing detail. JVC’s 4k e-shift technology, in addition to the D-ILA devices projects a crisp and clear image. The contrast ratio is an astonishing 1,500,000:1 due to the lens aperture which creates this profound effect. It’s truly at the top of its field. Using a quality projector screen in a dark room will make the picture that much better. It is quiet too and THX certified which really gives that home-theater experience. The projector comes with two pairs of 3D glasses so you can take your viewing to the next level.
- 12-inch injection molded long throw woofer
- 21 x 19 x 22 inches (HxWxD)
- Weight: 42.70 pounds each
- Backed by 5 year parts and labor warranty
Best 4K Projectors: What to Look For
When choosing between the best 4K home theater projectors, there are a few factors you should keep in mind. After all, they don’t come cheap so you’ll want to know what you’re looking at. Here’s a few quick things to look for when you’re searching for a 4k projector.
Resolution
Obviously, resolution is what dictates whether a projector is 4K or not. 4K resolution is 3840 x 2160, compared to traditional 1080p HD with a resolution of 1920 x 1080 pixels. You’ll want to ensure that the projector can project at the resolution that you’re looking for. The higher the better. Additionally, some projectors are ‘compatible’ with 4K resolution however they dull it down to 1080p. It’s important to find out whether or not the projector projects in 4K, or if it is just compatible with 4K. A true 4K projector will project in 4K resolution.
Aspect Ratio
4K projectors have a fixed resolution, and therefore have a fixed aspect ratio, or native aspect ratio. Projectors typically come in a few popular aspect ratios: 16:9, 4:3 and 16:10. If you look at the resolution, you’ll be able to identify the aspect ratio. Simply navigate to this Aspect Ratio Calculator and type in the resolution.
Lumens
Lumens refers to the brightness of the projector’s lamp. The higher the lumens, the brighter it can project. Brighter isn’t always better, but if you have a theater with a lot of ambient light, you’ll want a projector with a higher lumens rating. Vice versa, if you have a dark room for your theater, a projector with a lower lumens rating will be just fine. When you’re choosing a projector, keep in mind that small differences between lumens (100-300 lumens) is not a significant difference. We recommend 1,200 lumens or higher for a dark home theater room and at least 3,000 lumens for rooms with tons of ambient light.
Contrast Ratio
Contrast ratio can be defined as the ration between the brightest and darkest pictures that a projector can emit. A higher contrast ratio will bring out more vibrant detail in colors. However, there are a lot of factors that contrast ratios don’t account for, including how the projector displays grays. The key thing with contrast is to look for good processing, like sRGB and BrilliantColor modes to control the projector’s display. Contrast ratio is important, however it’s not the most important factor to consider in a projector.
Connectivity
How do you plan to connect your video source to your projector? Connectivity is very important when considering any sort of video equipment. 4K projectors will all come with a 4K compatible HDMI input, but do you need additional inputs like VGA (analog), Mobile High-Definition Link (MHL) enabled ports, Wi-Fi connectivity? Knowing exactly how you’re going to be connecting your sources to the projector is critical to your decision making.
Ease of Setup & Use
If you look to install the projector on your own, understanding how easy it is to install and setup can be a very important factor. Is the graphic user interface easy to navigate and setup? Is it easy to customize the image to your liking? Does it have all of the hardware you need to install in your home theater? Although it may not be the most important factor, be sure to consider these questions.
And once you find the perfect 4k projector for you, be sure to read through our directions on Setting Up a Home Theater Projector so that your new projector is properly configured and installed!
Setting Up a 4K Projector
Setting up a video projector can require a little more thought and effort than a 4k HDTV that sits on top of a piece of furniture. For an HDTV, the only thing you need to worry about is wires and placement. Projectors are different. But don’t let that discourage you. A new 4K or 1080p projector can provide some of the best media viewing experiences right to your home. Our quick guide to setting up a video projector, we’ll walk you through the basics to getting a home theater projector up and running with ease.
1. Choosing a Screen For Your Home Theater Projector
Without a projector screen or quality surface, your projector will not perform to its full potential. TVs have their screens built in, but for projectors you need to determine the type of screen that will work best with the projector that you’ve purchased.
Once you have chosen a screen, you’ll need to find the ideal location and decide how you’re going to mount it. When your screen is set up, you’re ready to begin installing and configuring your new video projector.
2. Placing Your Projector
Placement is a critical step to setting up your projector too. It will determine the quality and performance of your video. There are four key positions to consider:
Front Positioning: This is the most easy to set up and probably one of the most common. Front positioning when the projector is placed on a surface that is in front of the projector screen. Configuring the distance is easy since it’s at a height that you can reach it. However, unless it’s mounted to the surface your projector might be more prone to movement, which could require you to re-focus and configure.
Ceiling Mounted: Another common position for projectors is to simply mount it to your ceiling. This position is the same as front, but mounted higher. The benefit is that the projector with is out of your way, but it’s a little more difficult to install than a front position.
If you choose to ceiling mount the projector, you’ll need to connect it to a ceiling mount. Most projectors on ceiling mounts are upside down and you’ll need to invert the image so that it is right side up after installation. Make sure that your projector supports ceiling mounting and can invert the image; otherwise it’ll be upside down.
Rear Positioning: Rear positioning is a little less common. If you have the space to do it, it’s a great option. In a rear position, it’s essentially the same as front position but the projector is located behind the screen and projects onto it. For this time of placement, you’ll need a rear projection compatible screen however.
If you choose rear placement, the image will be horizontally reversed by default. You’ll need to ensure that your projector supports rear placement, and once it’s placed flip the image 180 degrees horizontally so that the image is correct. Otherwise, you’ll be reading your movie and show title backwards!
Rear Ceiling Mounted: Combine the rear positioning with ceiling mounted and this is what you get. You’ll need a rear projection compatible screen and will need to mount it to your ceiling.
Once you’ve chosen the position that best fits your space, you’re ready to start to install it. Be sure to read through the manual to find the optimal distance for placement. This applies to all positions.
If you chose between Ceiling Mounted and Rear Ceiling Mounted, there are a few things that you will need to consider when you install the projector. For one, you’ll want to ensure the distance matches what’s recommended for your projector. Measuring distance for a ceiling mounted projector is a little bit different than front mounted (and a little more difficult). Most of the projectors will provide charts in the user manual to help calculate the distance that you’ll need to place it. One recommended method is to measure the distance on the ground and use a pole to mark the location from the ground to the ceiling. However this can be tricky. Make sure that it’s centered with your screen. Epson offers a great tool that calculates distances for you. You can find it here.
3. Connect Everything & Turn It On!
Now that your projector is mounted, it’s time to connect power and all of the sources. Once power is connected, and you have a video source connected it’s time to turn it on and begin testing and adjusting the image (if needed).
First, align the image to your screen. You can do this by going into your projectors menu and adjusting the placement. Select the placement that you’re using so that the image is correct (if it’s upside down, backwards, etc).
After you’ve selected your placement you’ll want to start to adjust the image on the screen. See our next step
4. Adjusting Your Image
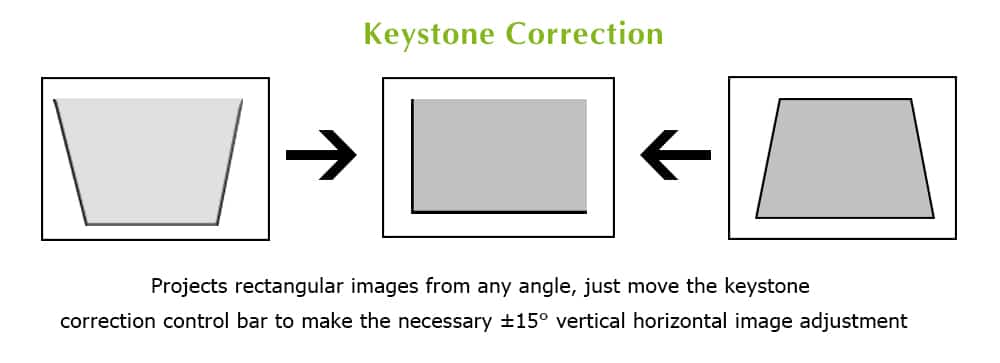
Now that you have your image on your screen and it’s projecting correctly, you’ll need to adjust the image to fit exactly to your screen. You can do this using what’s called Keystone Correction.
Keystone Correction is a tool that’s used to make sure that the sides of your projector’s image align with the screen rectangle as best as possible. Within the projector’s settings, find the keystone or image settings and adjust the image so that it fits perfectly in your screen. Within this tool you’ll be able to adjust the width, height, scale, position.
5. Focusing & Optimizing Your Image
The final step to setting up your projector for home theater viewing is to focus and optimize your image. The first thing you need to do is set the default aspect ration. This is the length and width ratio that the image will appear as. Typically, for home theaters 16:9 is the optimal aspect ratio.
Focusing is next. Project an image that has a few long visible lines that you can see clearly. Once you have this image projected, adjust your projector’s focus until the lines are clear and precise and the blur is gone. Different projectors have different ways to adjust the focus so refer to your manual to do this.
Finally, there’s the picture quality. Your projector will come with a number of preset picture settings. These are simple, hassle free settings that allow you to choose which picture looks best for the media that you’ll be watching. For example, you may see Normal, Dynamic, Standard, Cinema, Sports, etc. Choose the configuration that best projects the type of image you’ll be watching (e.g. sports or movies).
Or, if you’re the savvy type, you can enter the video projector’s manual settings to adjust things like tint (hue), sharpness, brightness color, video noise reduction (DNR), Gamma, and more. If you are not familiar with these settings, it’s not recommended that you adjust them. Stick to the presets.
A 4K projector is a type of projector that can display images and video in ultra-high definition resolution (3840×2160 pixels), which is four times the resolution of standard 1080p HD. This means that 4K projectors can deliver more detailed, vivid, and lifelike images than HD projectors.
A 4K projector can offer a much larger and more immersive viewing experience than a TV, with image sizes of up to 120 inches or more. It can also provide superior color accuracy, contrast, and brightness compared to an HD projector, resulting in a more realistic and engaging image quality.
When choosing a 4K projector, it’s important to consider factors such as image quality, brightness, contrast ratio, input lag, and compatibility with other devices. You’ll also want to consider the size and layout of your viewing room, as well as your budget, when selecting a projector.
Some of the top-rated 4K projectors brands on the market include the Sony, Epson, JVC, and Optoma. Many of which can be found on our list!
HDR, or High Dynamic Range, is a technology that enhances the contrast and brightness of images, resulting in more vivid and realistic colors. Many 4K projectors now include HDR support, allowing them to display a wider range of colors and brightness levels for a more immersive viewing experience.
Properly setting up and calibrating a 4K projector involves adjusting the projector’s brightness, contrast, color, and other settings to match the lighting and viewing conditions of your room. This may involve using a calibration tool or software to fine-tune the projector’s settings for optimal image quality.
The ideal screen size and distance for a 4K projector will depend on the size and layout of your room, as well as your personal viewing preferences. Generally, you’ll want to choose a screen size that is appropriate for the viewing distance, with larger screens requiring greater distance. A general rule of thumb is to aim for a screen size that is roughly 1/6th of the viewing distance, with a minimum viewing distance of 1.5 times the screen width.